วันศุกร์ที่ 7 มิถุนายน พ.ศ. 2562

วิธีการสร้างพาติชั่น เพื่อเพิ่มฮาร์ดดิสใน Linux Ubuntu 18.04


ตัวอย่าง : พื้นที่ฮาร์ดดิสก์ที่ใช้ในเครื่องคอมพิวเตอร์เหลือน้อย ต้องการใส่ฮาร์ดดิสก์ลูกใหม่เพิ่มเข้ามา ดังนั้นเพื่อให้มันใช้งานได้เราต้องทำการสร้าง Partition ให้ ฮาร์ดดิสก์ลูกนี้ซะก่อน ... ขั้นตอนมีดังนี้ !

StepA. การแบ่งพาร์ติชั่น (Partition)
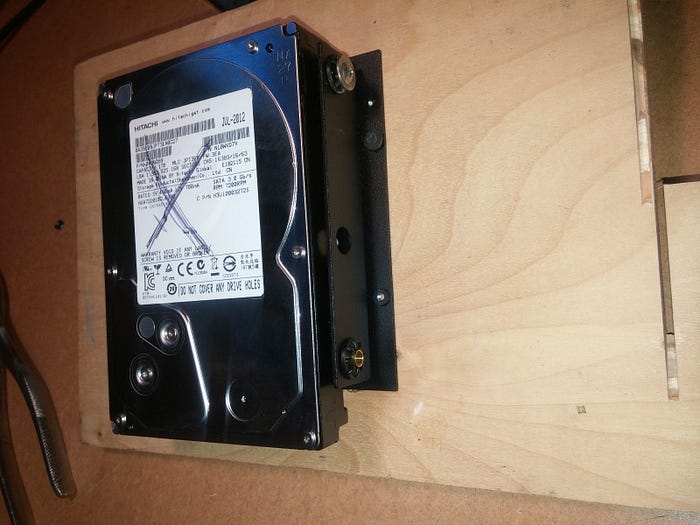
1. อย่างแรก, หลังจากเชื่อมต่อฮาร์ดดิสก์เข้ากับคอมพิวเตอร์แบบ SATA, เราสามารถตรวจสอบฮาร์ดดิสก์ใหม่โดย
sudo fdisk -l

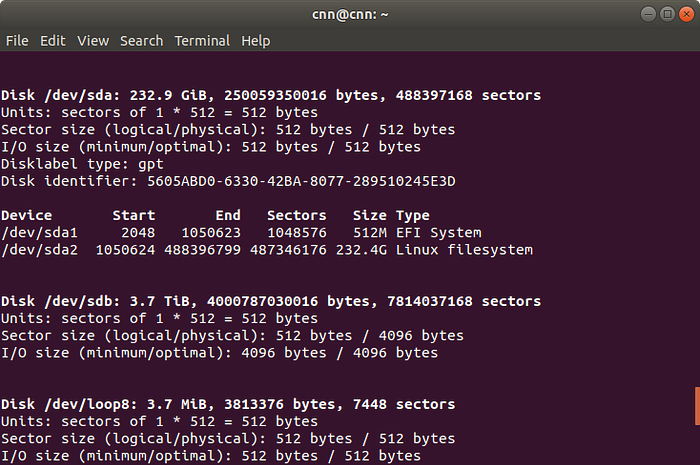
/dev/sdb เป็นฮาร์ดดิสก์ใหม่ใส่เข้ามา

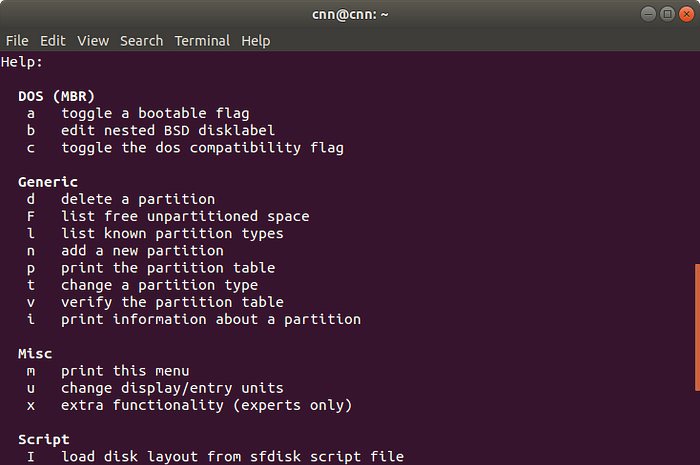
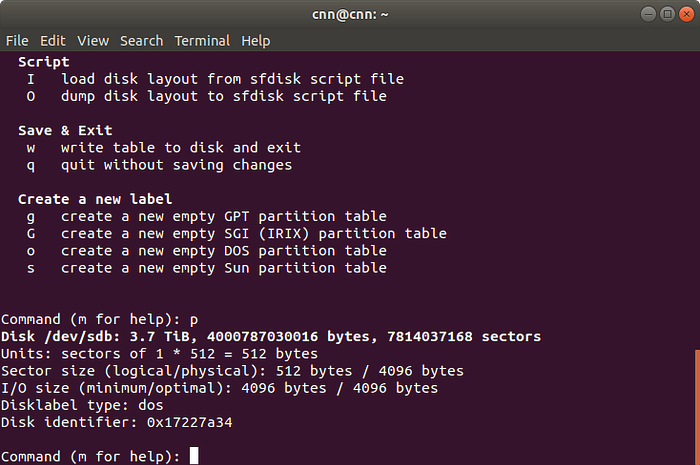
2. เมื่อเราเห็นดิสแต่ละรายการแล้ว ให้ลองกด "m" Enter เพื่อดูคำสั่งช่วยเหลือ


3. ต่อไปให้ลองทำการเช็คตารางพาร์ติชั่น ให้ลองกด "p" Enter

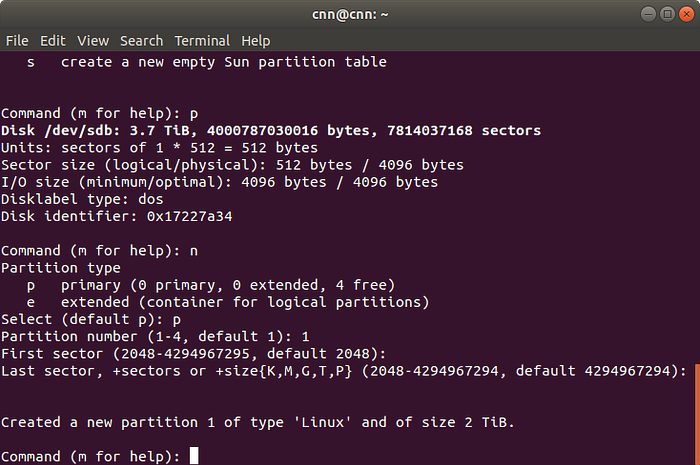
4. เพิ่มทำการพาร์ติชั่นให้กด "n" Enter แล้วเลือก primary โดยกด "p" Enter. แล้วกด "1" สำหรับระบุหมายเลขพาร์ติชันเดียวเท่านั้น

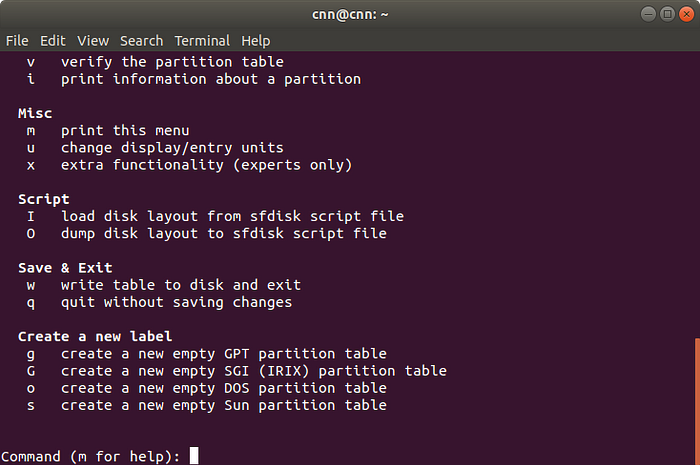
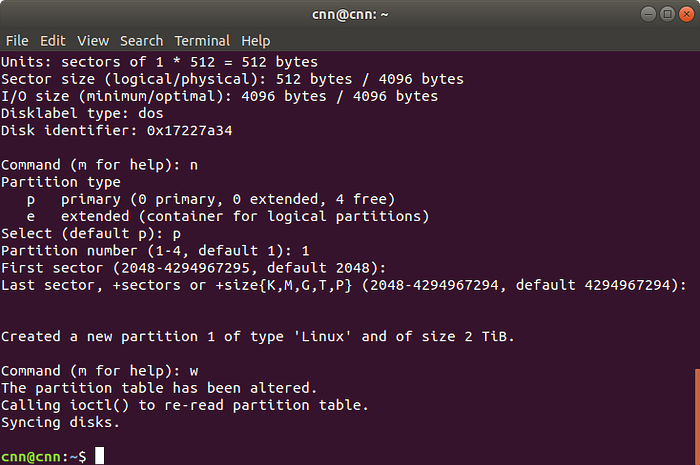
5. กด "w" เพื่อเขียนตารางพาร์ติชันลงดิสก์

StepB. การฟอร์แมท
1. ฟอร์แมตฮาร์ดดิสก์ที่พาร์ติชันใหม่
sudo mkfs.ext4 /dev/sdb


StepC. การติดตั้งดิส (รวมถึงการเมาท์ดิสอัตโนมัติเมื่อมีการรีบูตเครื่องคอมพิวเตอร์)
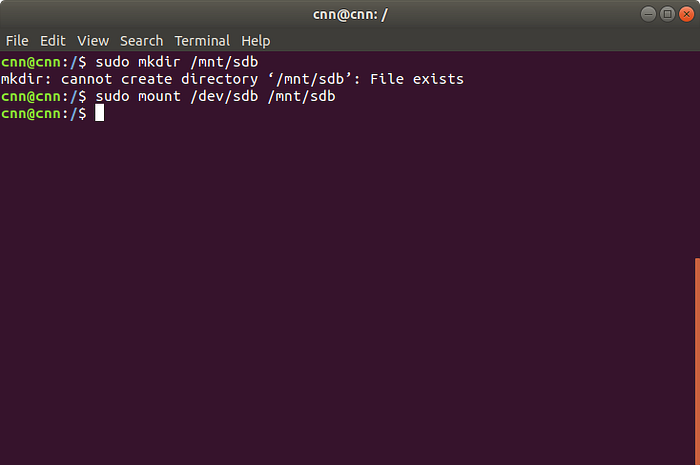
1. ปกติแล้วดิสที่เพิ่มเข้าไปใหม่จะเมาท์ไว้ที่ /mnt/. โดยสร้างไดเรกทออรี่ไว้ใน /mnt/ ก่อน...ตัวอย่าง
sudo mkdir /mnt/sdb
2. แล้วทำการเมาท์ดิสไปไว้ในไดเรกทอรี่ที่ชื่อ sdb
sudo mount /dev/sdb /mnt/sdb


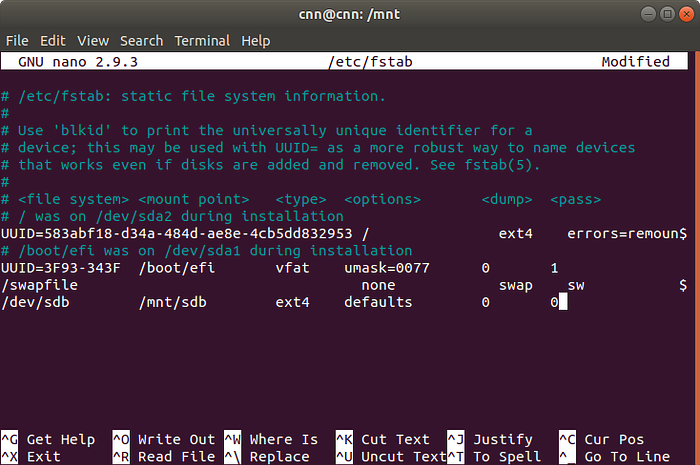
3. ทุกครั้งที่เรารีบูทเราต้องทำการติดตั้งดิสใหม้ ดังนั้นหากต้องการติดตั้งอัตโนมัติหลังจากรีบูตให้ใช้เพิ่มคำสั่งไว้ในไฟล์ /etc/fstab ดังนี้<
nano /etc/fstab
เพิ่มข้อความดังนี้
/dev/sdb     /mnt/sdb      ext4        defaults      0       0

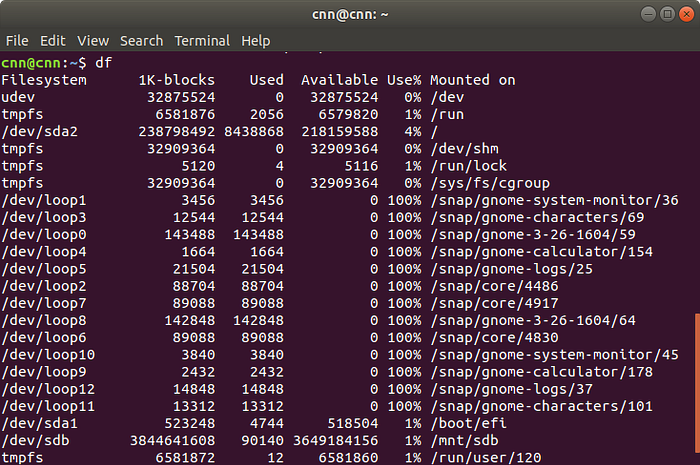
StepD. การตรวจสอบฮาร์ดดิสก์ที่เพิ่มเข้ามา ซึ่งสามารถใช้ได้ทั้ง 3 คำสั่งด้วยกันดังนี้ 1. mount
mount | grep sdb
2. lsblk
lsblk

3. df
df


Read more ...

วันศุกร์ที่ 3 พฤษภาคม พ.ศ. 2562

วิธีการติดตั้ง Let's Encrypt SSL บน Ubuntu 18.04 & 16.04 LTS แบบโดเมนเนมเดียว (Standalone)

        Let's Encrypt เป็นผู้ออกใบรับรอง (CA) ที่ให้บริการใบรับรอง SSL / TLS ฟรี คุณสามารถรับใบรับรอง SSL ที่ถูกต้องสำหรับโดเมนของคุณโดยไม่มีค่าใช้จ่าย ใบรับรองเหล่านี้สามารถใช้งานจริงในระดับองค์กรได้ แต่จะขอใบรับรองได้เซิร์ฟเวอร์นั้นต้องมีการจดโดเมนเนมไว้แล้วเท่านั้น Let's Encrypt จะทำการตรวจสอบ DNS สำหรับโดเมนโดเมนและจะชี้ไปยังไอพีแอดเดรสของเซิร์ฟเวอร์นั้นๆ หลังจากตรวจสอบเรียบร้อยก็จะออกใบรับรองให้คุณ บทความนี้จะช่วยสอนให้คุณติดตั้ง SSL Certificate บนระบบปฏิบัติการ Ubuntu

ขั้นตอนที่ 1 ตรวจสอบ Prerequisites ของระบบก่อนทำการติดตั้ง
สามารถใช้งาน Ubuntu ด้วยยูเซอร์รูทได้ (user root access)
เว็บเซิร์ฟเวอร์ที่ติดตั้งต้องมีโดเมนเนมที่เป็น Public IP address เช่น xyz.com, www.xyz.com และสามารถชี้ไปยังเซิร์ฟเวอร์ของ Let's Encrypt ได้
เว็บเซิร์ฟเวอร์ที่เป็น VirtualHost ที่ตั้งค่าไว้สำหรับ xyz.com, www.xyz.com จะต้องใช้งานบนพอร์ต หมายเลข 80

ขั้นตอนที่ 2 ติดตั้ง Let’s Encrypt Client
        ดาวน์โหลด certbot-auto let’s encrypt client และบันทึกภายใต้ path /usr/sbin โดยใช้คำสั่งดังนี้
$ sudo wget https://dl.eff.org/certbot-auto -O /usr/sbin/certbot-auto
$ sudo chmod a+x /usr/sbin/certbot-auto

ขั้นตอนที่ 3 การออกใบรับรอง SSL Certificate
        Let's Encrypt ทำการตรวจสอบโดเมนที่โดยอัตโนมัติพร้อมการทำ challenges เพื่อยืนยันความเป็นเจ้าของโดเมน เมื่อ Certificate Authority (CA) ตรวจสอบความถูกต้องของโดเมนของคุณแล้วจะมีการออกใบรับรอง SSL โดยใช้คำสั่งดังนี้
$ sudo certbot-auto certonly --standalone -d xyz.com  -d www.xyz.com
ในระหว่างการตรวจสอบจะมีถามคำถามอีกสองสามข้อ ในการระบุที่อยู่อีเมลซึ่งใช้สำหรับส่งการแจ้งเตือนทางอีเมลที่เกี่ยวข้องกับการต่ออายุ และการหมดอายุของ SSL หลังจากเสร็จสิ้นก็จะออกใบรับรอง SSL และจะสร้างไฟล์ที่ใช้สำหรับกำหนดค่าใน VirtualHost ใหม่ในระบบของคุณ
ไฟล์ที่ได้:
cert.pem, chain.pem, fullchain.pem, privkey.pem

ขั้นตอนที่ 4 ตั้งค่า SSL VirtualHost
        ใช้การตั้งค่าต่อไปนี้สำหรับเว็บเซิร์ฟเวอร์ Apache และ Nginx ให้แก้ไขไฟล์กำหนดค่า VirtualHost และเพิ่มรายการด้านล่างสำหรับใช้งาน certificate
$ nano /etc/apache2/sites-available/xyz.com.com-ssl.conf
สำหรับ Apache :
SSLEngine on
SSLCertificateFile /etc/letsencrypt/live/xyz.com/fullchain.pem
SSLCertificateKeyFile /etc/letsencrypt/live/xyz.com/privkey.pem

ขั้นตอนที่ 5 สั่งให้ apache2 รับ site ใหม่
        สั่งให้ apache2 รับ site ใหม่ด้วยคำสั่ง
$ a2ensite xyz.com.com-ssl.conf
คำสั่งในการตรวจสอบอายุของ SSL certificate
$ echo | openssl s_client -connect xyz.com:443 2>/dev/null | openssl x509 -noout -dates

ขั้นตอนที่ 6 การตั้งค่าสคริปต์ให้รันทุกๆ 60 วัน โดยเพิ่มเข้าไปใน crontab (user root)
$ crontab –e
0 0 */60 * *  /usr/sbin/certbot-auto -q renew


ศึกษาเพิ่มเติมได้ที่ : https://letsencrypt.org/
อ้างอิงจาก : https://tecadmin.net/install-lets-encrypt-create-ssl-ubuntu/

Read more ...

วันจันทร์ที่ 29 เมษายน พ.ศ. 2562

วิธีแก้ไข Error: The computer hyperv.xxx is joined to a cluster

Error: The computer hyperv.xxx is joined to a cluster.   

       ปัญหา Error จากการพยายามเพิ่มโหนดในเฟลโอเวอร์คลัสเตอร์ พบว่าขั้นตอนในการตรวจสอบการ joined computer นั้นไม่สามารถเพิ่มเข้าไปได้ ปัญหาที่เกิดขึ้นอาจจะมาจากมีข้อมูลเดิมค้างอยู่ในเครื่องที่ต้องการ joined node เข้าไป ดังนั้นวิธีแก้ไขที่คาดว่าน่าจะได้ผลที่สุดคือการเคลียร์โหนดออกจากคลัสเตอร์นั้นๆ

วิธีแก้ไข
  1. เปิดใช้งาน PowerShell
  2. พิมพ์คอมมานด์ดังนนี้ :
    1. > Import-Module FailoverClusters
    2. > Clear-ClusterNode
    3. > [y]


Read more ...

วันพฤหัสบดีที่ 31 มกราคม พ.ศ. 2562

วิธีสร้าง Wildcard SSL certificate โดยใช้ Let's Encrypt/Certbot


ขั้นตอนที่ 1 - การติดตั้ง Certbot

ขั้นตอนแรกในการใช้ Let's Encrypt เพื่อรับใบรับรอง SSL คือการติดตั้งซอฟต์แวร์ Certbot บนเซิร์ฟเวอร์ของคุณ
1. ก่อนอื่นให้เพิ่ม certbot ลงใน repository 
$ sudo add-apt-repository ppa:certbot/certbot

2. ติดตั้งแพ็คเกจ Apache ของ Certbot ด้วย apt
$ sudo apt install python-certbot-apache


ขั้นตอนที่ 2 วิธีขอใบรับรอง SSL แบบ Wildcard Cert

การขอใบรับรอง SSL แบบ Wildcard Cert ให้พิมพ์ command ดังนี้

$ ./certbot-auto certonly --manual --preferred-challenges dns --email example@gmail.com --server https://acme-v02.api.letsencrypt.org/directory --agree-tos -d *.example.com

ใบรับรองที่ออกโดย Let's Encrypt จะมีอายุในการใช้งานอยู่ที่ 90 วัน ดังนั้นจำเป็นที่จะต้องขอใบรับรองใหม่ทุกๆ 90 วัน ด้วยคำสั่งต่อไปนี้

$ letsencrypt-auto renew --force-renewal


Read more ...

วันเสาร์ที่ 26 มกราคม พ.ศ. 2562

รวมปัญหาการอัพเกรด Ubuntu 18.04

Error1. Please install all available updates for your release before upgrading.
วิธีแก้ไข ให้ใช้ command ดังต่อไปนี้
$ sudo apt update
$ sudo apt upgrade
$ sudo apt dist-upgrade
$ sudo do-release-upgrade

$ sudo do-release-upgrade -d

Error2. PHP extensions gmp 
สำหรับ PHP 7.1: วิธีแก้ไข ให้ใช้ command ดังต่อไปนี้
$ sudo apt-get install php7.1-gmp

สำหรับ PHP 7.2: วิธีแก้ไข ให้ใช้ command ดังต่อไปนี้
$ sudo apt-get install php7.2-gmp

Error3. Could not get lock /var/lib/apt/lists/lock - open (11: Resource temporarily unavailable)

วิธีแก้ไข ให้ใช้ command ดังต่อไปนี้
$ sudo rm /var/lib/apt/lists/* -vf 
$ sudo apt-get update


Read more ...

วันศุกร์ที่ 4 มกราคม พ.ศ. 2562

วิธีเพิ่มขนาดไฟล์อัพโหลดใน phpmyadmin

ในการเพิ่มขนาดไฟล์ Import MySQL ของ phpmyadmin  ใน Ubuntu 16.04 หรือใหม่กว่า ให้ทำตามขั้นตอนเหล่านี้ ใน Ubuntu สำหรับรุ่นใหม่ล่าสุด PHP 5 หรือ PHP 7


Step - 1  เปิดไฟล์ php.ini
  • สำหรับ PHP เวอร์ชั่น 5.0
    sudo nano /etc/php5/apache2/php.ini
  • สำหรับ PHP เวอร์ชั่น 7.0
    sudo nano /etc/php/7.0/apache2/php.ini
  • สำหรับ PHP เวอร์ชั่น 7.1
    sudo nano /etc/php/7.1/apache2/php.ini
  • สำหรับ PHP เวอร์ชั่น 7.2
    sudo nano /etc/php/7.2/apache2/php.ini

Step - 2  ให้แก้ไขพารามิเตอร์ด้านล่างในไฟล์ php.ini (ctrl+w) ช่วยในการค้นหา
memory_limit = 500M

post_max_size = 500M

upload_max_filesize = 500M
*ไม่ควรเพิ่มขนาดในการอัพโหลดไฟล์มากเกินไป เพื่อป้องกันการโจมตีผ่านการอัพโหลดไฟล์ขนาดใหญ่เข้าไปในระบบ และ post_max_size ควรใหญ่กว่า upload_max_size

Step - 3 รีสตาร์ทเซิร์ฟเวอร์ apache

sudo service apache2 restart

Read more ...

วันศุกร์ที่ 2 พฤศจิกายน พ.ศ. 2561

Problems...!! Cannot install python-certbot-apache on Ubuntu 18.04


$ sudo apt-get install python-certbot-apache

Reading package lists... Done
Building dependency tree
Reading state information... Done
Some packages could not be installed. This may mean that you have
requested an impossible situation or if you are using the unstable
distribution that some required packages have not yet been created
or been moved out of Incoming.
The following information may help to resolve the situation:

The following packages have unmet dependencies:
 python-certbot-apache : Depends: python3-certbot-apache but it is not going to be installed
E: Unable to correct problems, you have held broken packages.


Try..This Command

$sudo add-apt-repository universe
$sudo apt-get update

Good Luck!!


Read more ...

วันพุธที่ 17 ตุลาคม พ.ศ. 2561

ปัญหา phpMyAdmin and PHP 7.2: “Warning in ./libraries/sql.lib.php#613 count():

วิธีแก้ไข


1.ทำสำเนาไฟล์ไว้ต้นฉบับไว้ก่อน เพื่อป้องกันการผิดพลาด
sudo cp /usr/share/phpmyadmin/libraries/sql.lib.php /usr/share/phpmyadmin/libraries/sql.lib.php.bak
2. เข้าไปแก้ไขที่ sudo nano /usr/share/phpmyadmin/libraries/sql.lib.php

กด CTRL + W แล้วหาบรรทัด (count($analyzed_sql_results['select_expr'] == 1)
ให้เปลี่ยนเป็น ((count($analyzed_sql_results['select_expr']) == 1)

แล้วกด Save

Read more ...

วันเสาร์ที่ 30 กันยายน พ.ศ. 2560

วิธีใช้ Drive File Stream

วิธีใช้ Drive File Stream

ติดตั้ง Drive File Streamในองค์กรเพื่อการเข้าถึงไฟล์ในไดรฟ์จากคอมพิวเตอร์อย่างรวดเร็วและง่ายดาย
บทความนี้เขียนขึ้นสำหรับผู้ดูแลระบบ หากต้องการเรียนรู้วิธีใช้ Drive File Stream โปรดดูศูนย์ช่วยเหลือผู้ใช้

การทำงานของ Drive File Stream

คุณสามารถใช้ Drive File Stream เพื่อสตรีมไฟล์ในไดรฟ์จากระบบคลาวด์ไปยัง Mac หรือพีซีของคุณโดยตรง เพื่อช่วยเพิ่มพื้นที่ดิสก์และแบนด์วิดท์ของเครือข่าย เนื่องจากไฟล์ในไดรฟ์บันทึกอยู่บนระบบคลาวด์ การเปลี่ยนแปลงต่างๆ ที่คุณและเพื่อนร่วมงานกระทำกับไฟล์ก็จะได้รับการอัปเดตในทุกๆ ที่โดยอัตโนมัติ คุณจะมีไฟล์เวอร์ชันล่าสุดเสมอ
นอกจากนี้ คุณยังสามารถทำให้ไฟล์ในไดรฟ์พร้อมให้เข้าถึงแบบออฟไลน์ได้อีกด้วย ไฟล์ที่แคชแล้วเหล่านี้จะซิงค์กลับไปที่ระบบคลาวด์ทันทีที่ออนไลน์ ทำให้มีเวอร์ชันล่าสุดในทุกอุปกรณ์

การติดตั้ง Drive File Stream 

  1. ยืนยันว่าองค์กรของคุณสามารถใช้ Drive File Stream ได้ โดยคุณสามารถใช้ Drive File Stream ได้กับระบบปฏิบัติการเหล่านี้
    • Windows: Windows 7 เป็นต้นไป แต่ไม่รองรับรุ่น Windows Server
    • Mac: El Capitan (10.11) เป็นต้นไป โปรดทำตามขั้นตอนเหล่านี้สำหรับ High Sierra (10.13)
  2. เปิดการซิงค์สำหรับองค์กรหากยังไม่ได้เปิด อย่าลืมอนุญาต Drive File Stream แล้วระบุว่าผู้ใช้จะเห็นลิงก์ดาวน์โหลด Drive File Stream ได้หรือไม่
  3. ติดตั้ง Drive File Stream ในคอมพิวเตอร์ของผู้ใช้แต่ละราย โดยเลือกใช้วิธีใดวิธีหนึ่งดังต่อไปนี้
    • ให้ผู้ใช้แต่ละรายติดตั้ง Drive File Stream ในเครื่องของตน
    • ดาวน์โหลดไฟล์ .exe สำหรับ Drive File Stream และติดตั้งในโหมดปิดเสียง
      1. ดาวน์โหลด GoogleDriveFSSetup.exe
        ดาวน์โหลดเลย
      2. เรียกใช้โปรแกรมติดตั้งในโหมดปิดเสียงด้วยคำสั่งต่อไปนี้
            GoogleDriveFSSetup --silent
      3. (แนะนำ) ถอนการติดตั้งไดรฟ์สำหรับ Mac/PC และแอปการสำรองและซิงค์ข้อมูลในองค์กร
      4. (ไม่บังคับ) ลบโฟลเดอร์ Google ไดรฟ์ที่ \Users\%USER%\Google Drive โปรดใช้ความระมัดระวังในการลบโฟลเดอร์ เพราะอาจมีเนื้อหาที่ยังไม่บันทึกหรือยังไม่ซิงค์
      1. ดาวน์โหลด GoogleDriveFileStream.dmg
        ดาวน์โหลดเลย
      2. เรียกใช้โปรแกรมติดตั้งในโหมดปิดเสียงด้วยคำสั่งต่อไปนี้
            Sudo installer -store -pkg GoogleDriveFileStream.dmg -target
      3. (แนะนำ) ลบไดรฟ์สำหรับ Mac/PC และแอปพลิเคชันการสำรองและซิงค์ข้อมูล
      4. (ไม่บังคับ) ลบโฟลเดอร์ Google ไดรฟ์ที่ ~/Google Drive โปรดใช้ความระมัดระวังในการลบโฟลเดอร์ เพราะอาจมีเนื้อหาที่ยังไม่บันทึกหรือยังไม่ซิงค์
Read more ...

วันอังคารที่ 26 กันยายน พ.ศ. 2560

วิธีแก้ อัพเกรดเวอร์ชั่น Ubuntu แล้วขึ้นข้อความ "You might want to run 'apt-get -f install' to correct these."


คำสั่งการ update  ubuntu
#apt-get update
#apt-get upgrade
#apt-get autoremove
#update-grub
#reboot
#uname -r


วิธีแก้ อัพเกรดเวอร์ชั่น Ubuntu แล้วขึ้นข้อความ "You might want to run 'apt-get -f install' to correct these."
หากเกิด error ในระหว่าง update ubuntu ให้ใช้คำสั่งดังนี้


Read more ...

วันศุกร์ที่ 15 กันยายน พ.ศ. 2560

Mouse Not Captured In Remote Desktop Sesion in Hyper-V

Hyper-V Getting Started Guide

TipTip
Hyper-V is enhanced in Windows Server 2012. Explore the Evaluation Guide and download the Windows Server 2012 Trial.
Hyper-V is a role in Windows Server® 2008 and Windows Server® 2008 R2 that provides you with the tools and services you can use to create a virtualized server computing environment. This type of environment is useful because you can create and manage virtual machines, which allow you to run multiple operating systems on one physical computer and isolate the operating systems from each other. This guide introduces Hyper-V by providing instructions for installing this role and configuring a virtual machine.
noteNote
For a more in-depth introduction to using Hyper-V, see Getting to Know Hyper-V: A Walkthrough from Initial Setup to Common Scenarios. It shows you how to use features that make it easier to create multiple virtual machines and to make temporary changes that you can easily roll back.

Requirements for Hyper-V

Hyper-V has specific requirements. Hyper-V requires an x64-based processor, hardware-assisted virtualization, and hardware data execution prevention (DEP). Hyper-V is available in x64-based versions of Windows Server 2008—specifically, the x64-based versions of Windows Server 2008 Standard, Windows Server 2008 Enterprise, and Windows Server 2008 Datacenter. For more information about the requirements, see the Hyper-V installation prerequisites (http://go.microsoft.com/fwlink/?LinkId=122183).

Known issues

Known issues are described in the release notes. We recommend that you review the release notes before you install Hyper-V.
To download the Hyper-V release notes, see http://go.microsoft.com/fwlink/?LinkId=98821. The release notes are also available in the Windows Server 2008 Technical Library (http://go.microsoft.com/fwlink/?LinkId=102060).

Step 1: Install Hyper-V

noteNote
If your computer is running Windows Server 2008, verify that your computer has been updated with the release version of Hyper-V before you install Hyper-V. If your computer is running Windows Server 2008 R2, skip this step.
The release version (RTM) of Windows Server 2008 included the pre-release version of Hyper-V. The release version of Hyper-V is offered through Windows Update as a recommended update, ‘Hyper-V Update for Windows Server 2008 x64 Edition (KB950050)’. However, you also can obtain the update through the Microsoft Download Center. To download this update, see http://go.microsoft.com/fwlink/?LinkId=123539. To determine whether the update has been applied to your computer, do one of the following:
  • On a full installation of Windows Server 2008, click Start, click Windows Update, click View update history, and then click Installed Updates.
  • On a Server Core installation, at the command prompt, type:

    wmic qfe list

    Look for update number kbid=950050, which indicates that the update for Hyper-V has been installed.
You can install Hyper-V on either a full installation or a Server Core installation. You can use Server Manager to install Hyper-V on a full installation, as described in the following procedure. To install on a Server Core installation, you must perform the installation from a command prompt. Run the following command:
Start /w ocsetup Microsoft-Hyper-V
noteNote
To manage Hyper-V on a Server Core installation, you can use the Hyper-V management tools to manage the server remotely. The management tools are available for Windows Server 2008 and Windows Vista Service Pack 1. For more information, see article 950050 (http://go.microsoft.com/fwlink/?LinkId=122188and article 952627 (http://go.microsoft.com/fwlink/?LinkId=122189) in the Microsoft Knowledge Base.

To install Hyper-V on a full installation of Windows Server 2008

  1. Click Start, and then click Server Manager.
  2. In the Roles Summary area of the Server Manager main window, click Add Roles.
  3. On the Select Server Roles page, click Hyper-V.
  4. On the Create Virtual Networks page, click one or more network adapters if you want to make their network connection available to virtual machines.
    noteNote
    The type of network you can create in this step is called an external virtual network. If you create it now you can connect the virtual machine to it when you create the virtual machine in Step 2. To create virtual networks later or reconfigure existing networks, see “Step 4: Configure virtual networks.”
  5. On the Confirm Installation Selections page, click Install.
  6. The computer must be restarted to complete the installation. Click Close to finish the wizard, and then click Yes to restart the computer.
  7. After you restart the computer, log on with the same account you used to install the role. After the Resume Configuration Wizard completes the installation, click Close to finish the wizard.

Step 2: Create and set up a virtual machine

After you have installed Hyper-V, you can create a virtual machine and set up an operating system on the virtual machine.
Before you create the virtual machine, you may find it helpful to consider the following questions. You can provide answers to the questions when you use the New Virtual Machine Wizard to create the virtual machine.
  • Is the installation media available for the operating system you want to install on the virtual machine? You can use physical media, a remote image server, or an .ISO file. The method you want to use determines how you should configure the virtual machine.
  • How much memory will you allocate to the virtual machine?
  • Where do you want to store the virtual machine and what do you want to name it?

To create and set up a virtual machine

  1. Open Hyper-V Manager. Click Start, point to Administrative Tools, and then click Hyper-V Manager.
  2. From the Action pane, click New, and then click Virtual Machine.
  3. From the New Virtual Machine Wizard, click Next.
  4. On the Specify Name and Location page, specify what you want to name the virtual machine and where you want to store it.
  5. On the Memory page, specify enough memory to run the guest operating system you want to use on the virtual machine.
  6. On the Networking page, connect the network adapter to an existing virtual network if you want to establish network connectivity at this point.
    Note
    If you want to use a remote image server to install an operating system on your test virtual machine, select the external network.
  7. On the Connect Virtual Hard Disk page, specify a name, location, and size to create a virtual hard disk so you can install an operating system on it.
  8. On the Installation Options page, choose the method you want to use to install the operating system:
    • Install an operating system from a boot CD/DVD-ROM. You can use either physical media or an image file (.iso file).
    • Install an operating system from a boot floppy disk.
    • Install an operating system from a network-based installation server. To use this option, you must configure the virtual machine with a legacy network adapter connected to an external virtual network. The external virtual network must have access to the same network as the image server.
  9. Click Finish.
After you create the virtual machine, you can start the virtual machine and install the operating system.

Step 3: Install the guest operating system and integration services

In the final step of this process, you connect to the virtual machine to set up the operating system, which is referred to as the guest operating system. As part of the setup, you install a software package that improves integration between the virtualization server and the virtual machine.
The instructions in this step assume the following:
  • You specified the location of the installation media when you created the virtual machine.
  • You are installing an operating system for which integration services are available. For a list of these operating systems, see About Virtual Machines and Guest Operating Systems.

To install the guest operating system and integration services

  1. From the Virtual Machines section of the results pane, right-click the name of the virtual machine you created in step 2 and click Connect. The Virtual Machine Connection tool will open.
  2. From the Action menu in the Virtual Machine Connection window, click Start.
  3. Proceed through the installation.
    Notes
    • When you are at the point where you need to provide input to complete the process, move the mouse cursor over the image of the setup window. After the mouse pointer changes to a small dot, click anywhere in the virtual machine window. This action "captures" the mouse so that keyboard and mouse input is sent to the virtual machine. To return the input to the physical computer, press Ctrl+Alt+Left arrow and then move the mouse pointer outside of the virtual machine window.
    • After the operating system is set up, you are ready to install the integration services. From the Action menu of Virtual Machine Connection, click Insert Integration Services Setup Disk. On Windows operating systems, you must close the New Hardware Wizard to start the installation. If Autorun does not start the installation automatically, you can start it manually. Click anywhere in the guest operating system window and navigate to the CD drive. Use the method that is appropriate for the guest operating system to start the installation package from the CD drive.
After you have completed the setup and integration services are installed, you can begin using the virtual machine. You can view or modify the virtual hardware that is configured for the virtual machine by reviewing the settings of the virtual machine. From the Virtual Machines pane, right-click the name of the virtual machine that you created in step 3 and click Settings. From the Settings window, click the name of the hardware to view or change it. For more information, see Configuring Virtual Machines (http://go.microsoft.com/fwlink/?LinkId=122190).

Step 4: Configure virtual networks

You can create virtual networks on the server running Hyper-V to define various networking topologies for virtual machines and the virtualization server. There are three types of virtual networks you can create:
  1. An external network, which provides communication between a virtual machine and a physical network by creating an association to a physical network adapter on the virtualization server.
  2. An internal network, which provides communication between the virtualization server and virtual machines.
  3. A private network, which provides communication between virtual machines only.
The following procedures provide the basic instructions for configuring virtual networks. For more information about designing and deploying virtual networks, see Configuring Virtual Networks.

To create a virtual network

  1. Open Hyper-V Manager.
  2. From the Actions menu, click Virtual Network Manager.
  3. Under Create virtual network, select the type of network you want to create. The types of network are External, Internal, and Private. If the network you want to create is an external network, see “Additional considerations” below.
  4. Click Add. The New Virtual Network page appears.
  5. Type a name for the new network. Review the other properties and modify them if necessary.
    noteNote
    You can use virtual LAN identification as a way to isolate network traffic. However, this type of configuration must be supported by the physical network adapter. For information about configuring virtual LAN identification, see “Configuring virtual local area networks” in Configuring Virtual Networks.
  6. Click OK to create the virtual network and close Virtual Network Manager, or click Apply to create the virtual network and continue using Virtual Network Manager.

To add a network adapter to a virtual machine

  1. Open Hyper-V Manager. Click Start, point to Administrative Tools, and then click Hyper-V Manager.
  2. In the results pane, under Virtual Machines, select the virtual machine that you want to configure.
  3. In the Action pane, under the virtual machine name, click Settings.
  4. In the navigation pane, click Add Hardware.
  5. On the Add Hardware page, choose a network adapter or a legacy network adapter. Network adapters can only be added to a virtual machine when the machine is turned off. For more information about each type of adapter, see "Additional considerations" below.
  6. Click Add. The Network Adapter or Legacy Network Adapter page appears.
  7. Under Network, select the virtual network you want to connect to.
  8. If you want to configure a static MAC address or virtual LAN identifier, specify the address or identifier you want to use.
  9. Click OK.
Read more ...